SecurityNet: User Guide

System Requirements
What you’ll need to run SecurityNet smoothly on your system.

Windows

macOS

Disk Space
Memory & Performance

Tip: For optimal performance when handling multiple file transfers or encrypted chats, keep background processes to a minimum.

Next: See the Internet Requirements section.

Internet Requirements
SecurityNet can operate over any standard broadband connection, but faster speeds improve reliability.
Minimum Upload/Download Speed
File Size Support
Stability & Reliability
Tip: If you often send large encrypted files, wired Ethernet is more reliable than Wi-Fi.
Next: See the SecurityNet Installation section.


Windows

Apple Mac (macOS)
SecurityNet is essentially a Windows Application. To run on macOS SecurityNet has been wrapped inside a Windows emulation program called Wine.
As this has NOT been added to the Apple App Store, there are multiple ways to install.
Click here to see the various ways to install the software on your Mac.
Follow the Installation Process, below.

Verifying Your Download (Optional)
All SecurityNet executables are digitally signed.
On Windows:
Right-click the downloaded file
Select Properties
Open the Digital Signatures tab
Confirm the signer is ZAT TEK LTD
If SecurityNet has been altered or corrupted, it will automatically refuse to run.

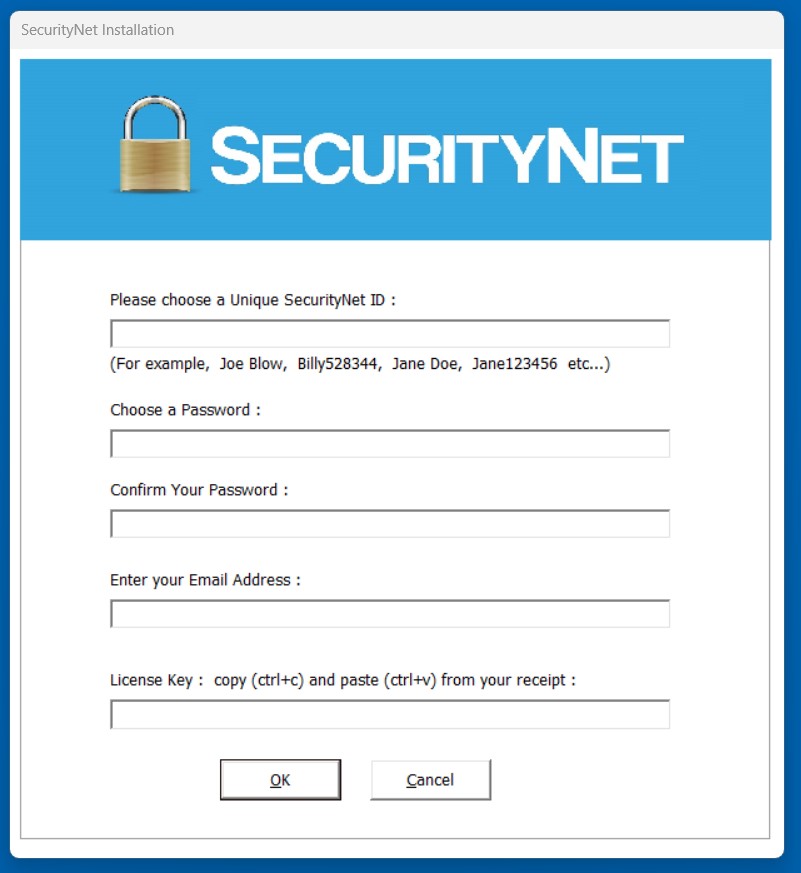
Installation Process
You will be presented with the SecurityNet Installation screen:
Next: See the Administration & Network Control section.

Administration Overview
The Admin panel is available only to the License Owner.
It provides full control over:
Authorising internal users
Granting or revoking permissions
Allowing external invitations
Enabling group creation
Maintaining controlled access to the licensed network
All permissions default to disabled for new shared-license users and must be explicitly enabled by the License Owner.

User Roles Explained
License Owner
The License Owner controls the licensed network and can:
Approve or revoke internal users
Enable or disable Invite External permission
Enable or disable Create Groups permission
Control who may participate in group messaging
Only users authorised by the License Owner can log in.
Internal Users
Internal users:
Must be explicitly authorised to log in
Cannot invite external users unless granted permission
Cannot create groups unless granted permission
Can only access groups they are added to
Permissions are granular and must be deliberately enabled.
External Users
An External user:
- Holds their own independent SecurityNet license
- Can be added to Contacts by an authorised internal user
- Is marked as “External” in Contacts
- Cannot access internal groups
- Cannot see or interact with other internal members
- Communicates only with the internal user who added them
External connections do not expand access to the licensed network.
Permission Controls (Admin Panel Columns)
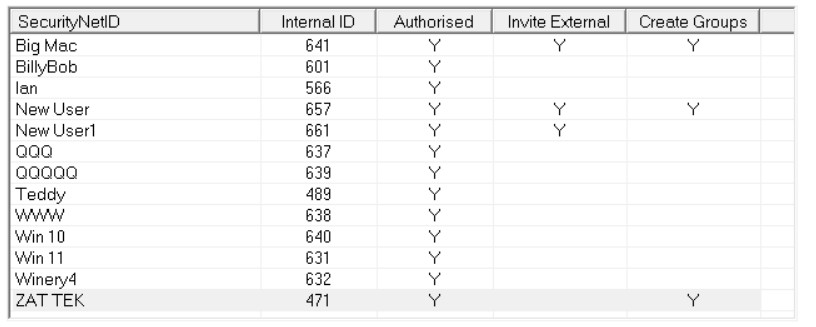
Authorised
Determines whether the user may log in to the licensed network.
Invite External
Allows the user to add external licensed users to the Contacts List
Disabled by default for new license users.
Create Groups
Allows the user to create internal groups for licensed network members.
Disabled by default unless granted.
Security Model Summary
SecurityNet uses a default-deny permission model:
New users cannot log in until authorised.
Permissions are disabled unless explicitly enabled.
External contacts remain isolated from internal groups.
No user gains broader network access automatically.
This ensures full administrative control while allowing flexible, secure peer connections when deliberately enabled.
Network Considerations
- SecurityNet provides end-to-end encryption between authorised endpoints and does not rely on VPNs for its core security model.
- For general network privacy—particularly on untrusted or public networks—users may choose to use a VPN as an additional layer of protection.
Next: See the SecurityNet Licenses section.

SecurityNet Licenses
How your license works, how to manage it, and how to share access securely.

The License Key

The SecurityNet License

Note: Shared users can use the app independently, but only the Owner can raise support tickets or modify the plan.
License Management - How to manage, upgrade, or purchase your own SecurityNet license.
- 1Click File → Manage License in the top-left corner of SecurityNet.
- 2The Owner can view activations and choose to upgrade or extend the license.
- 3Upgrades allow you to: (a) Increase the number of activations; and (b) Move from a Monthly to an Annual plan

Sharing the License - The Owner can share their license with trusted users up to the activation limit.
Note: Sharing is ideal for teams, family and group setups, or business partners who need encrypted communication without separate purchases.
Next: Learn how to add and manage your contacts — see the Contacts section.

Contacts
How to add, manage, and communicate with your contacts securely.

Watch: Managing Contacts
How do I communicate with my contacts?
Tip: You don’t need to know a contact’s email address or phone number — communication happens only through SecurityNet IDs.

How to add a new contact?

How do I update a contact?

How do I delete a contact?

If they still have you in their list, they will also lose the ability to connect.

Can I see if contacts are online?
Groups
How to create, manage, and use Groups for shared encrypted file access.

What is a Group?
A Group is a private shared space that allows multiple SecurityNet users to exchange encrypted files through a single Group Folder.
It’s ideal for teams, departments, families, or projects that need joint access to common documents.
Tip: Groups make it simple to manage shared encrypted folders without using cloud services.
How to Add a New Group
- 1Click Groups → New Group
- 2Enter a Group Name and optional description.
- 3Click Save.
- 4Highlight your new group and select Members → Add Contacts.
- 5Check the boxes beside contacts you want to include, then click Add.
Note: Your new Group Folder will appear automatically in your file view.
Updating Group Members
Note: Changes take effect instantly — no need to resend invitations.
Removing a Member from a Group
When someone is removed, any pending file transfers to that member are cancelled automatically.

What Happens When Someone Adds or Removes Me?
Practical Uses
Next: Learn how to send encrypted files to your contacts or groups — see the Send Files section.
Send Files
How to securely send encrypted files to your contacts or groups.

Overview
SecurityNet allows you to send encrypted files directly to your contacts or groups — with no cloud storage, no metadata, and no residual copies left behind.
Think of it as a direct, encrypted hand-off between devices — simple, private, and under your full control.

How to Select Files to Send
- 1Open the Contacts List
● Double-click a contact or a Group; or select multiple Contacts and click Save Selection.
- 2Go to the Send Files screen
● Click Add Files and navigate to the folder containing your data.
- 3Choose Files
● Highlight the files you want to send.
● Select Copy to Selection List (this confirms your choices).
- 4Confirm & Send
● Click the Send Files button.
● The system will ask for confirmation before encrypting and sending.
Note: You can queue multiple files — SecurityNet will handle each securely in sequence

Is there a File size limit?
Sending to Multiple Contacts
Note: This saves time while maintaining full end-to-end encryption per user.
Navigating Folders
Removing Files from the Selection List
Once a transfer has started, the files can’t be modified or recalled.
Encryption Process
When you press Send Files, SecurityNet:
- 1Encrypts each file using your unique session key.
- 2Transmits it directly to the recipient’s inbox — no cloud, no relay storage.
- 3Deletes temporary working copies automatically after confirmation.
Note: If the recipient is NOT online, SecurityNet simply holds the request the queue. When the recipient logs on, the files will send.
Next: Learn how to chat securely with your contacts — see the Chat Messages section.

Chat Messages
How to send, receive, and manage encrypted chats in SecurityNet.
Overview
SecurityNet’s chat feature lets you send fully encrypted messages to your contacts — all without using any third-party servers or cloud storage.
Each chat session is private, direct, and automatically encrypted end-to-end.
No one (not even SecurityNet) can see your messages, metadata, or contact list.
Note: Chat in SecurityNet is NOT real-time. To avoid using the cloud to relay messages, they are sent as peer-to-peer files. It takes a minute or so for chats to reach the recipient.
Sending a Chat Message
- 1Click Start a New Chat.
- 2Select a contact from your list.
- 3Type your message in the text box (bottom-right corner).
- 4Click Send and your message is queued to send.
Note: When pasting text from Word or other rich editors, some symbols or emojis may be replaced or removed.
Receiving Messages
When a new encrypted message arrives:
All messages are decrypted on your device only.
Deleting Chats
If a message is still pending delivery, it cannot be deleted until it’s sent or cancelled (on the Status screen).
Next: Learn how to track your file transfers and message delivery — see the Status Screen section.

Status Screen
How to track your messages and file transfers in real time.
Overview
The Status Screen gives you a live overview of all your SecurityNet activity — including sent files, received files, and active chat sessions.
It’s your dashboard for monitoring progress, confirming delivery, and identifying any issues.
Note: All statuses are automatically updated — no refresh required, unless you turn off the Auto Refresh.
Viewing Details in Real-Time
Network Status and Online/Offline Status
Availability & Online Status
Cancel a pending send/receive
Next: Learn how to review and manage your transfer history — see the Activity Log section.

Activity Logs
How to review your SecurityNet history and verify past activity.
Overview
The Activity Log records every important event in SecurityNet — sent and received files, chat sessions, group updates, and status changes.
It provides a private audit trail stored only on your device, so you can always verify what happened without exposing data online.
Each entry includes:
The log automatically updates in real time as you use SecurityNet.
Note: Logs are not uploaded or synced — your log stays local and encrypted unless you choose to share it.
System and Traffic Logs

Real-Time Logs
Next: Learn how to manage received and sent files — see the Inbox/Outbox section.

Inbox / Outbox
View, decrypt, and manage your received and outgoing files securely.
Overview
Every contact in SecurityNet has two file areas:
These are displayed in the main app interface for quick access and easy management.

Inbox
Once a file is decrypted, you can:

Outbox
If a file remains in your Outbox for an extended time, check your internet connection or your contact’s online status.
Tips for Use
Next: Learn how to manage settings and configuration — see the Settings section.
Settings
Adjust SecurityNet preferences, password protection, and 2FA for enhanced security.
Overview
SecurityNet allows you to configure how logs, notifications, and authentication behave.
All settings are stored locally, giving you full control over your data and privacy preferences.
Note: Settings changes apply immediately — no restart required.
General Settings

Password and Email Updates
If you forget your password, you can request a rest from the Login Screen.
2FA Authentication Settings
Two-Factor Authentication adds another layer of protection when signing in.
Tips for Use of 2FA
Group Chat
Group Chat is an optional feature and must be explicitly enabled by each user.
Next: Learn about how SecurityNet manages encrypted transfers in the background — see Send / Receive Process section.

The Send / Receive Process
How SecurityNet transfers encrypted files safely between devices.

Send / Receive Overview
The Send / Receive process is the heart of SecurityNet.
It handles all file encryption, transmission, receipt, and verification between users — automatically, securely, and entirely within your private network tunnel.
All one-to-one messages and files remain stored on the sender’s device until the recipient is online, at which point they are AES-encrypted and transferred directly over an end-to-end AES-encrypted peer-to-peer tunnel, with no server or cloud involvement.
In SecurityNet, chat messages are handled the same way as files: each message is encrypted locally and transferred as a secure data object through the peer-to-peer tunnel.
Note: Think of it as your encrypted delivery engine — always local, always under your control.
Encryption Layers
SecurityNet uses a double encryption system for every transfer:
- 1A tunnel-level encryption secures the live connection between sender and receiver using one-time-use passwords.
- 2Each file is individually encrypted inside that tunnel, ensuring even intercepted data is unreadable.
This means your files remain encrypted in transit and while stored on the sender’s and recipient’s devices, and are only decrypted by the intended recipient.
How It Works
This is the process that controls all the connections for your contacts. This works behind the scenes to send your files to your contacts, and to receive their files into your inbox.
Send / Receive in Action
Note: The process can handle multiple transfers simultaneously, depending on your Max Processes setting.
Automatic Operation
Please note: If the Send / Receive main menu item is black, then the process is stopped. Nothing will happen until you turn it on again.

Error Handling
If a transfer fails:
